Deploying the Dassault Systèmes 3DEXPERIENCE platform on-premise requires transitioning from simple single-server architectures to high-availability, distributed infrastructures. For enterprise environments with hundreds or thousands of concurrent users, a single-box setup represents both a performance bottleneck and a single point of failure.
A production-grade, multi-server distributed architecture isolates the compute, storage, index, and database layers. This deep-dive technical blueprint walks through configuring a robust, horizontally scaled 3DEXPERIENCE On-Premise environment, complete with infrastructure flowcharts, network configurations, and programmatic parameters.
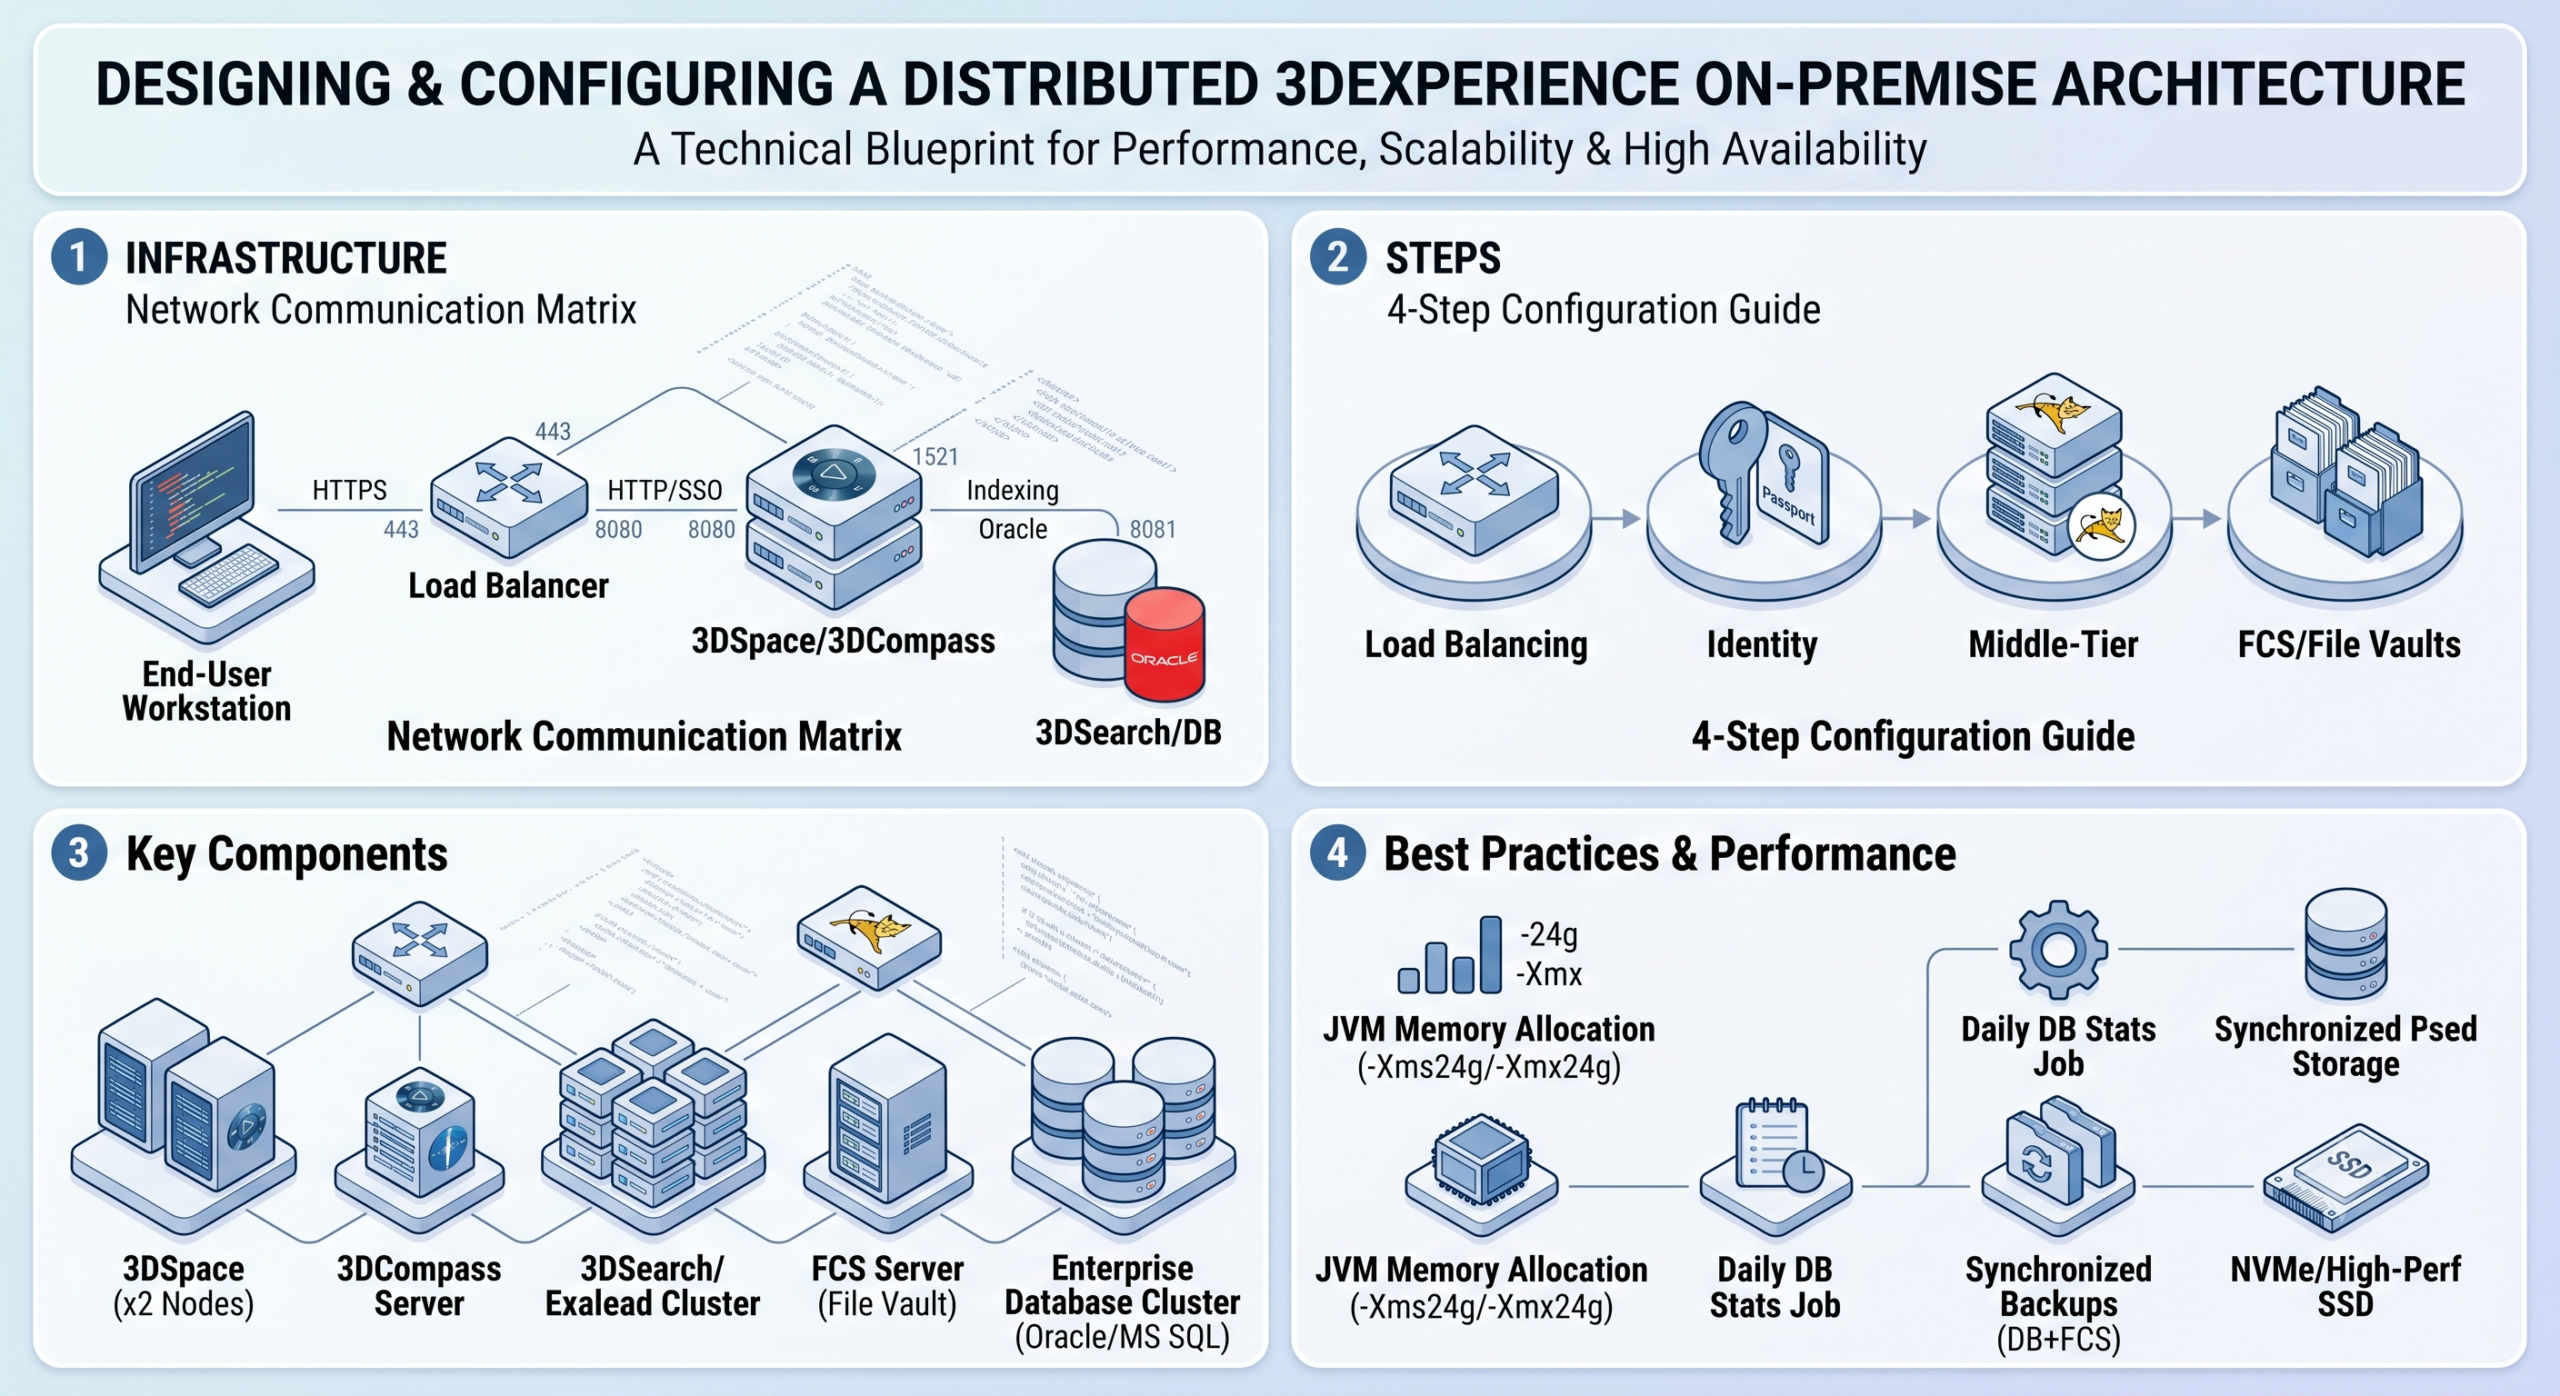
Architectural Topology: The Core Components
A resilient 3DEXPERIENCE environment splits logical roles across distinct server groups (nodes). This modular layout allows you to scale specific components independently based on user patterns, such as expanding search nodes for query-heavy work environments or increasing File Collaboration Servers for multi-site CAD data syncs.
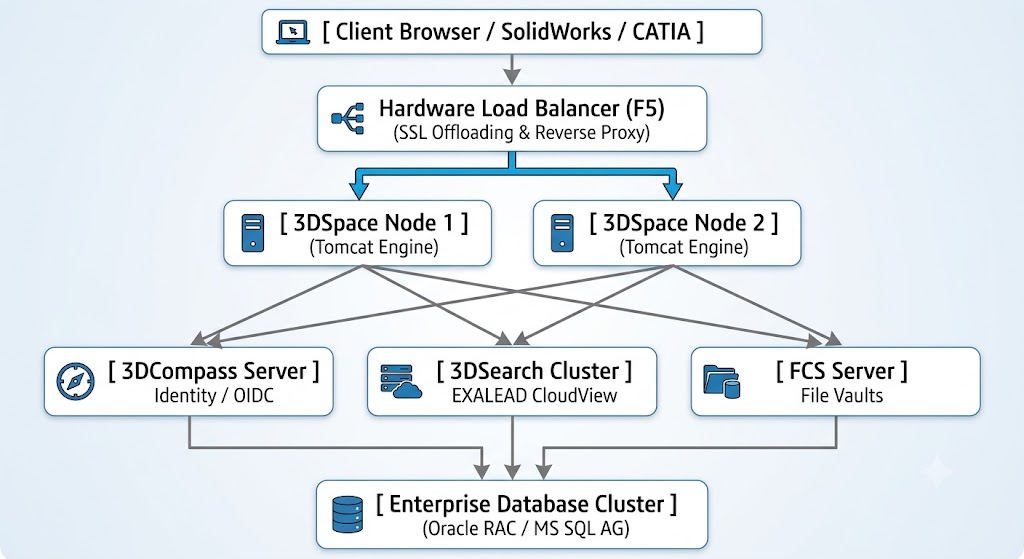
Server Node Mapping
- Reverse Proxy / Load Balancer: The unified public-facing entry point. It manages SSL termination, routes traffic based on URL context paths, and balances loads across middle-tier servers.
- 3DCompass (Identity Provider): The central authentication hub handling Single Sign-On (SSO), OpenID Connect (OIDC), and User Session tokens.
- 3DSpace (Core Application Server): Runs the main business logic via Apache Tomcat instances. It processes MQL (Matrix Query Language) commands and communicates with the database.
- 3DSearch / Exalead CloudView: The distributed search indexing cluster that enables rapid global indexing and metadata retrieval.
- File Collaboration Server (FCS): Manages the checking in and out of heavy physical CAD files, bypassing the main application server to streamline high-volume file transfers.
- Database Server: The data repository hosting business objects, relationships, and metadata (typically Oracle RAC or Microsoft SQL Server Availability Groups).
Infrastructure Prerequisites and Network Matrix
Host Specifications Matrix
To maintain low system latency, do not over-allocate virtualized resources past 75% of actual hardware capacity.
| Server Node | OS Recommendation | Minimum CPU (Cores) | Minimum RAM | Storage Tier |
| Load Balancer | Red Hat Enterprise Linux (RHEL) 8/9 | 4 Cores | 8 GB | Standard SSD |
| 3DCompass | RHEL 8/9 or Windows Server 2022 | 4 Cores | 16 GB | High-Performance SSD |
| 3DSpace (x2) | RHEL 8/9 or Windows Server 2022 | 8 Cores | 32 GB | High-Performance SSD |
| 3DSearch | RHEL 8/9 or Windows Server 2022 | 8 Cores | 64 GB | NVMe SSD (Fast I/O) |
| FCS Server | RHEL 8/9 or Windows Server 2022 | 4 Cores | 16 GB | High-Capacity SAN/NAS |
| Database | RHEL 8/9 (Oracle) / Win Server (SQL) | 16 Cores | 128 GB | Ultra-Low Latency NVMe |
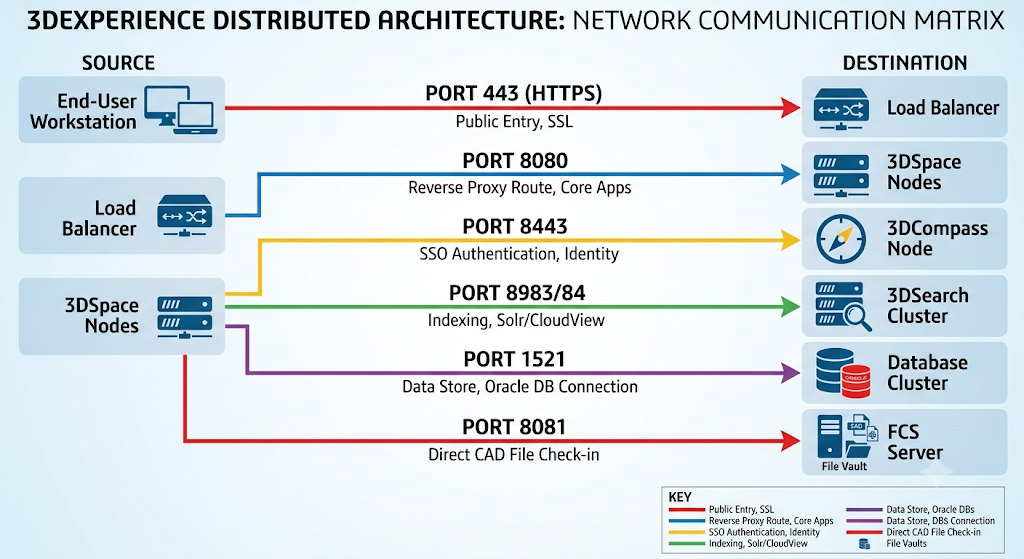
Network and Firewall Rule Settings
All nodes must communicate via Fully Qualified Domain Names (FQDN) using trusted TLS certificates
Step-by-Step Configuration Guide
To build out the architecture safely, deploy components in a strict, sequential order. This approach isolates network validation, identity verification, and core business transactions before configuring search and storage layers.
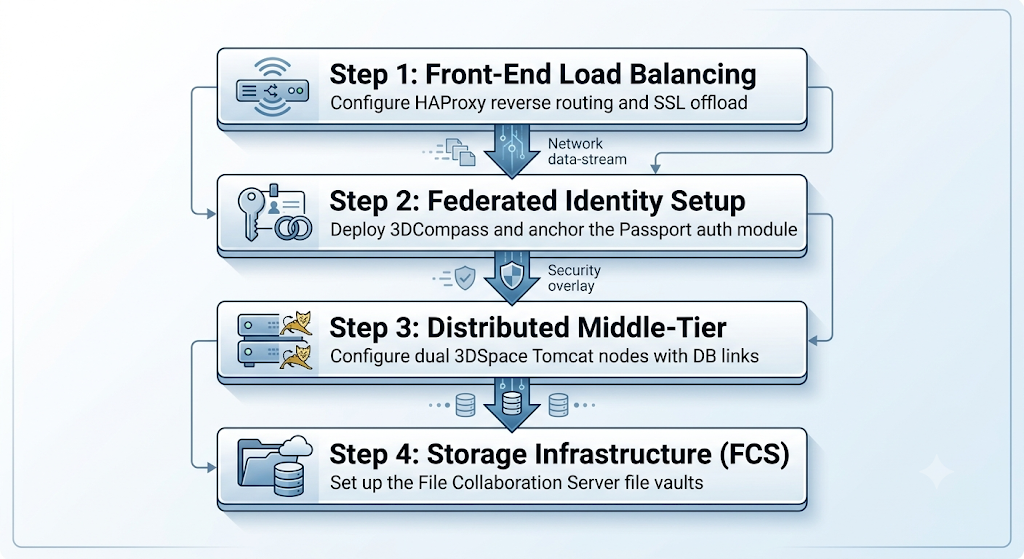
Step 1: Front-End Load Balancing & Reverse Proxy
Use HAProxy or an F5 Big-IP device to terminate incoming SSL handshakes and route traffic to your back-end application nodes.
Below is a configuration snippet for /etc/haproxy/haproxy.cfg designed to manage sticky user sessions using a servlet cookie prefix.
global
log 127.0.0.1 local2
chroot /var/lib/haproxy
pidfile /var/run/haproxy.pid
maxconn 4000
user haproxy
group haproxy
daemon
ssl-default-bind-ciphers PROFILE=SYSTEM
defaults
mode http
log global
option httplog
option dontlognull
option http-server-close
option forwardfor except 127.0.0.1
option redispatch
retries 3
timeout http-request 10s
timeout queue 1m
timeout connect 10s
timeout client 30m
timeout server 30m
timeout http-keep-alive 10s
timeout check 5s
frontend plm_ssl_ingress
bind 192.168.10.50:443 ssl crt /etc/pki/tls/certs/3dexp_platform.pem
http-request set-header X-Forwarded-Proto https
# Context routing rules
acl is_3dcompass path_beg -i /3dcompass
acl is_3DSpace   path_beg -i /3dspace

use_backend compass_cluster if is_3dcompass
use_backend space_cluster   if is_3DSpace
backend space_cluster
balance roundrobin
option httpchk GET /3dspace/serverStatus.jsp
# Cookie-based sticky sessions matching Tomcat JVM route names
cookie JSESSIONID prefix nocookies
server 3dspace_node1 192.168.10.52:8080 cookie node01 check inter 3000 rise 2 fall 3
server 3dspace_node2 192.168.10.53:8080 cookie node02 check inter 3000 rise 2 fall 3
backend compass_cluster
balance source
server 3dcompass_node 192.168.10.51:8443 check ssl verify none
Step 2: Federated Identity Setup (3DCompass)
The 3DCompass application functions as the OpenID Connect Identity Provider. Open your passport.config.allocator.xml file on the 3DCompass server to explicitly map internal tokens back to the load-balanced virtual domain.
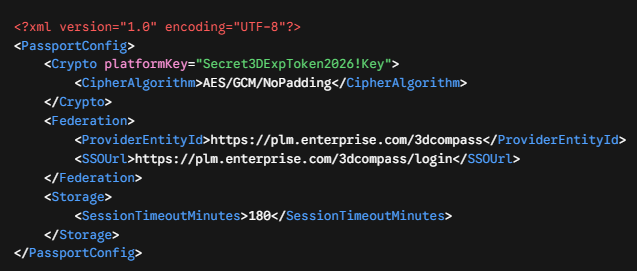
Step 3: Distributed Middle-Tier Setup (3DSpace Nodes)
Each Apache Tomcat instance running the 3DSpace kernel needs a direct link to the central cluster database.On both 3DSpace Node 1 and 3DSpace Node 2, navigate to your installation directory and configure the database connection pool within the server.xml file.
<Resource name="jdbc/3dspace_pool"
          auth="Container"
          type="javax.sql.DataSource"
          driverClassName="oracle.jdbc.OracleDriver"
          url="jdbc:oracle:thin:@(DESCRIPTION=(ADDRESS_LIST=(ADDRESS=(PROTOCOL=TCP)(HOST=rac-scan.enterprise.com)(PORT=1521)))(CONNECT_DATA=(SERVICE_NAME=3DEXP_SVC)))"
          username="matrix"
          password="EncryptedPasswordSchemaString"
          maxTotal="100"
          maxIdle="30"
          maxWaitMillis="10000"
          validationQuery="SELECT 1 FROM DUAL"
          testOnBorrow="true"
          removeAbandonedOnBorrow="true"
          removeAbandonedTimeout="60"
          logAbandoned="true"/>
Next, matching the sticky session rules configured in Step 1’s proxy script, edit the <Engine> parameters inside server.xml to match the specific route identifiers.
- For Node 1:
<Engine defaultHost="localhost" jvmRoute="node01" name="Catalina"> - For Node 2:
<Engine defaultHost="localhost" jvmRoute="node02" name="Catalina">
Step 4: Storage Infrastructure (FCS Server Configuration)
The File Collaboration Server requires registration inside the 3DSpace kernel so the platform knows where to route heavy file check-ins.
Log into your 3DSpace instance via the Matrix Query Language (MQL) administrative command line tool and run the following parameters to register your remote storage site.
# Open MQL context as platform administrator
set context person creator;

# Add the new File Collaboration Store location
add location "Main_FCS_Store"
    description "Primary On-Premise Storage Vault"
    protocol "https"
    host "fcs.enterprise.com"
    port "8081"
    path "/fcs/servlet/fcs"
    ftp "";

# Modify the store to activate local extraction and ticket validation
modify store "COMMON SPACE"
    add location "Main_FCS_Store";
Validating the Distributed Topology
Once you bring the system online, verify that your multi-server components are communicating correctly across the network.
Verification of the Load Balancer Health Status
Run this diagnostic command from an external server to ensure the proxy is correctly reading the node statuses.

Expected Response:

Validation of Cross-Node Ticket Generation
Verify that the 3DSpace middle-tier server is generating and passing authentication tokens to the 3DCompass passport service without routing errors.

Maintenance Best Practices for On-Premise Systems
Database Statistics Maintenance: Set up a nightly job to recalculate schema statistics on your database indexes. Outdated statistics can cause search queries to time out when querying complex bill of materials (BOM) trees.
Synchronized Storage Backups: Always take snapshots of your 3DSpace database instance and the physical FCS data store at the exact same time. Restoring a database without the corresponding physical files will lead to broken links and corrupted CAD object histories.
JVM Memory Allocation: For production 3DSpace Tomcat engines, always match the initial heap size (-Xms) with the maximum heap size (-Xmx) parameters to avoid mid-day memory reallocation lag. A safe baseline for a standard 32 GB RAM system is:

Migrating to a multi-server distributed architecture is more than just an infrastructure upgrade—it is a fundamental shift in how your enterprise protects and scales its digital thread. While setting up load balancers, database clusters, and dedicated storage nodes solves today’s performance and downtime bottlenecks, it also lays the foundation for future-proofing your business. As systems become more interconnected and automated through advanced analytics, AI-driven design, and closer supplier collaboration, ask yourself: Is your infrastructure built just to survive your current peak user traffic, or is it robust enough to anchor your next decade of product lifecycle innovation? The configuration decisions you make today will determine whether your PLM environment acts as a reactive data repository or a powerful engine for digital transformation.